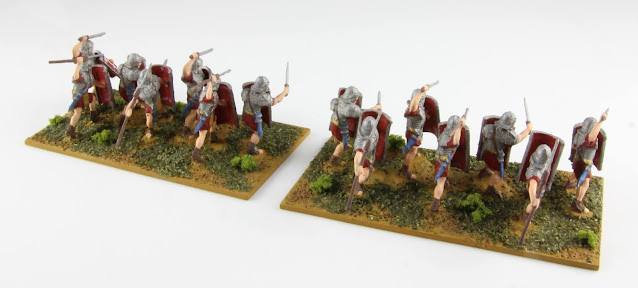
This is my first post in about a month, but not because I’ve been twiddling my thumbs. I’ve been working on a teeny tiny Roman army! I’ve wanted to assemble a Roman army for quite a while, but the tedium of painting dozens and dozens of near identical figures has always stopped me. About a month ago, I bit the bullet and decided that I would build an army for Basic Impetus published by the aptly named Dadi & Piombo. The armies needed for this game are relatively small and you can use miniatures in whatever scale you like. Another cool aspect of Basic Impetus is that it uses multibasing, so you can create very personalised and impressive looking armies.
Scale wise, I chose the somewhat uncommon 1:72. Uncommon for wargaming, that is, because it’s probably the most common scale for model kits. Firstly, size and detail wise it sits nicely in between 15mm and 28mm scale, striking the perfect balance between aesthetics and the amount of time it takes to build a decently sized army. Secondly, it is very cheap in comparison to 28mm. GW has the nerve to charge around € 30,- for individual character models. Well, for that sort of money you can buy 2 or 3 boxes of 40 to 50 miniatures each! And finally, I can purchase these miniatures locally or at least from within the EU, so no post-Brexit delays and import tax nonsense.
A big disadvantage, though, is the type of plastic used
for most 1:72 miniatures. The plastic is much softer than that used for model
kits or 28mm miniatures and it does not seem to take glue or paint as well as harder plastic. Some prep work is therefore required. Most importantly, you
should wash the miniatures. It is probably also a good idea to basecoat them
with diluted pva glue or a strong varnish. I use an acrylic semi gloss furniture
lacquer that I apply with a brush. It’s made by
a company called Glitsa
and is available at my local DIY store. Once the minis are painted I give them
another coat of Glitsa before spraying on a final coat of matte acrylic
varnish. The future will tell if this is enough to keep the paint from flaking
off. Fingers crossed!
The main body of my early imperial Roman army will be constructed from three boxes, Zvezda’s Roman Imperial Legionaries and Roman Auxiliary Infantry and Hät’s Imperial Roman Auxiliary Cavalry. A fourth box is on the way, though, which contains both Roman auxiliary archers for this army and some Ancient German warriors for another army that I’m planning. After all, my Romans do need someone to fight!
As said, I’m building this army for use with the Basic Impetus rules. The rulebook suggests using 8 cm wide bases for 15mm scale and 12 cm wide bases for 28mm scale. For 1:72 scale you can use either 8 or 12 cm, whichever you prefer. I chose to go with the former.
Today’s post is about
the legionaries, as my auxiliary infantry and cavalry are still waiting to be
painted. After some test fitting, I found that a regular 8x4 cm infantry base comfortably
holds seven models in two rows: four in the front and three in the back. I’ll be
making two of the bases for a total of 14 minis. The folks at Zvezda had the awesome
idea to include some figures in the box with which to form a testudo formation.
After some fiddling I ended up on a layout for my testudo of six shields wide
and three shields deep, for a total of 24 minis. Add to that a command base
with four minis and that’s a total of 42 legionaries.
A couple of
remarks on the Zvezda legionaries. The sculpting is great and the poses are really
energetic. The shields come as separate pieces, though, which are a bit of a
pain to attach to the figures. The holes in the shields are very snug and the
arms are very bendy, so that these tend to bend away when pressure is applied.
The only way I managed to get the shields attached to the hands was by
carefully enlarging the holes with a scalpel. Also, the shields have no raised
insignia on them, but the Zvezda auxiliary infantry figures do. It would look
silly for auxilia to have decorated shields and the legionaries to have plain
ones, so I had to freehand my own design for the legionaries. This meant quite a
bit more work, but it actually ended up being the most fun part of the whole process.
I usually don’t type out my entire painting process, but if I ever decide to expand my army it may actually come in handy. So, here goes:
Prep work
Free minis from their sprue prison and assemble if necessary
Attach minis to painting stands with poster tack
Base coat (brush) minis with acrylic clear semi-gloss furniture lacquer
Painting
Paint the tunics and shields red (Citadel Mephiston red)
Paint the skin (Vallejo Basic Skin Tone)
Paint the leather and wood (Citadel Gorthor Brown)
Paint the shield boss and belt gold (Citadel Auric Armour Gold)
Paint the scabbard blue (Citadel Galgar Blue)
Paint the bases light brown (Citadel Balor Brown)
Tidy up the shields and paint the rim silver (Citadel Ironbreaker)
Paint the design on the shields (Citadel White Scar)
Dark brown wash over everything
Protect the minis with another coat of lacquer
Basing
Glue used coffee grounds to base
Paint bases light brown (Citadel Balor Brown)
Brown wash (Citadel Gorthor Brown)


Comments
Post a Comment