
Roman watchtower

Roman watchtower

After wrapping up my wee Roman army with my Roman cavalry unit last month I needed a bit of a change of pace. Designing and scratch building a Roman watchtower to go with my army seemed just the thing. 

Most models of Roman watchtowers you find online are based on stone examples like those found along Hadrian’s Wall or in southern Germany. I, however, wanted to build a tower more like those found along the Dutch part of the limes, the border of the Roman Empire. As stone is pretty hard to come by in this tiny flat country of ours, watchtowers were either made entirely out of timber or had a timber frame with inset wattle and daub sections. 

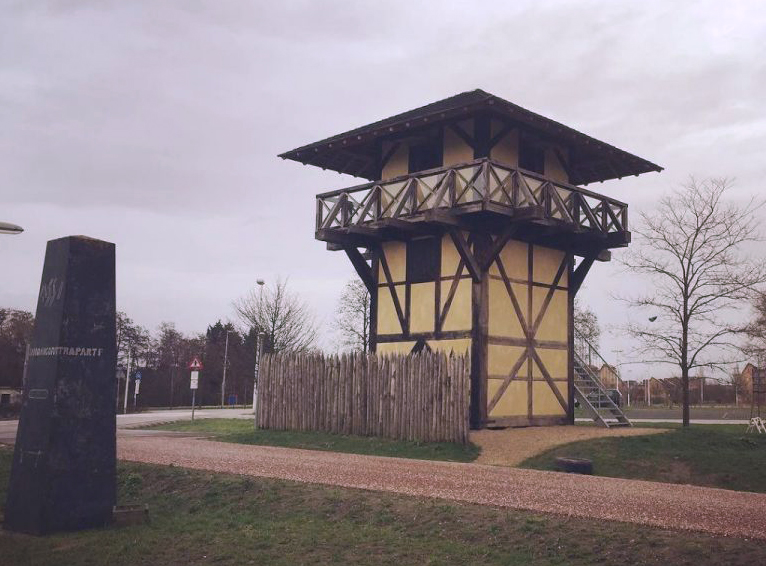
I particularly liked the look of the reconstructed watchtower at Vleuten-De Meern, with its dark timber frame and yellow wattle and daub. As you can see, my tower is quite heavily influenced by the Vleuten-De Meern watchtower, although I wasn’t too strict when it came to the exact dimensions.

The reconstructed watchtower at Vleuten-De Meern with gloomy Dutch sky.

When it comes to the construction, I think a picture is worth a thousand words: 

watchtower build 1

From left to right: The tower ‘body’ is made from corrugated cardboard. Polystyrene sheet is used for the base and balcony; 2. bamboo skewers are used to make the roof frame and support beams for the balcony; 3. triangles of thin, non-corrugated cardboard are glued on top of the roof frame.

Watchtower build 2

From left to right: 1. Overlapping strips of thin cardboard are glued to the roof. The strips are made to look like wooden shingles by cutting notches at regular 1 cm intervals and positioning the overlapping strips so that the notches are in a staggered pattern; 2. Wooden coffee stirrers (lovingly nicked by my wife from the cafeteria at her job) are used to line the edges of the wall, to delineate the first floor and to hide the seams of the roof. Strips of thin cardboard are used to make the smaller timber frames, doors and windows; 3. Coffee stirrers are used to add a railing to the balcony (later removed for ease of painting) and the wattle and daub sections of the walls are textured by dabbing on slightly watered-down wall filler/spackle with an old brush.

The tower was painted using acrylic crafts paint from a bargain store (Xenos, for you Dutch readers).

This cheap stuff doesn’t cover particularly well (the dark brown needed 3-4 coats), but sometimes that can work to your advantage. By applying only one heavy coat of ochre to the walls, the white of the underlying wall filler still shines through creating a nice weathered wattle and daub effect. I'm really quite proud how it turned out:

Roman watchtower

Comments

Popular posts from this blog

More simple Warhammer 40k terrain: craters and rubble piles

Time for some more simple 40k scenery: craters and rubble piles. Both are pretty easy projects and pretty quick too, if unlike me you plan out your work a little so you don’t need to continuously correct your mistakes along the way! For the craters, I started with two old writeable dvd’s. I first closed off the central holes with mdf miniature bases. I then broke off semi-triangular wedges of cork from a pan coaster and hotglued these to the dvds, forming circles (see the picture below). I then applied wall filler to the craters to hide the mdf circles covering the central holes and to add some texture to the cork. I then glued smaller bits of cork in between the larger wedges and added coffee grounds for texture. After this step I noticed that the cork wedges didn’t look very natural. Tapering them off made them look a lot better (picture below). I then gave everything a coat of black paint:  I still thought the craters didn’t look quite right, though. They were a bit too uniform ...

Space Wolves killteam

  Time for my second 100 pt. kill team, this time featuring the ever popular sci-fi Vikings known as Space Wolves. It’s a nice little group of three Intercessors and three Reivers. The new Primaris models are massive compared to the old Tactical Space Marines and to make them look even more impressive I based hem on bits of cork painted to look like rocks.   The models were primed in Citadel Fenrisian grey. After this, I painted most of the details apart from the faces of the two tough guys that are too cool to wear helmets. I then gave everything a black wash and added (a bit crudely) the odd edge highlight. I then painted the faces following a pretty simple process of applying a base skin colour, washing with brown and then highlighting with a lighter skin tone. Finally, I drybrushed the rocks with dark grey, then light grey and finally very gently with white. As a finishing touch I added two layers of AK Snow Sprinkles for a nice half-melted snow look.   I took my...

Gloomhaven characters

Back in the winter of 2020/2021, my wife and I played a lot of Gloomhaven. After several months of playing multiple games a week we put it away for a while, but recently we picked it back up again.  Gloomhaven is probably one of the best tabletop games I’ve played. The only downside in my mind is that it can easily take you 15 minutes to set up a scenario, especially if you don’t invest in some aftermarket box inserts to organise the literally thousands of tiles, tokens, cards and standees. But once you’ve set everything up, the game plays really well. Plus, I really like that it is a cooperative game in which the players need to work together to get through a scenario.   Anyway, the game comes with 18 plastic ‘heroic’ 28 mm or 32 mm scale miniatures. The monochrome grey plastic really stands out against the beautifully colourful floor tiles, so obviously these had to be painted... The plastic is a bit softer than your average model kit, but a lot harder than the soft plas...